


How to Print W-2 and W-3 Forms in QuickBooks: A Step-by-Step Guide
Learn how to print W-2 and W-3 forms in QuickBooks step by step. Ensure accurate employee tax reporting and meet filing deadlines with this easy-to-follow guide for QuickBooks users.

If youre an employer using QuickBooks, one of your year-end responsibilities is printing and filing W-2 and W-3 forms for your employees and the Social Security Administration (SSA). W-2 forms report employees annual wages and tax withholdings, while the W-3 form summarizes all W-2s submitted. With QuickBooks, the process is streamlined, but you still need to ensure everything is done correctly. Here's a step-by-step guide on how to print W-2 and W-3 forms in QuickBooks.
8 Tips to Resolve W-2 and W-3 Printing Issues in QuickBooks
Struggling with W-2 and W-3 printing errors in QuickBooks? Discover 8 practical tips to troubleshoot and fix common issues, ensuring smooth and accurate tax form printing every time.
Step 1: Ensure QuickBooks Payroll is Active
To print W-2 and W-3 forms, you must have an active QuickBooks Payroll subscription. This feature is only available to users with a payroll plan, either in QuickBooks Desktop or QuickBooks Online (with Enhanced Payroll).
Step 2: Verify Employee and Company Information
Before generating any forms, double-check that all employee and company data is up to date. Go to Employees > Employee Center, and review each profile for accuracy, including:
-
Social Security Numbers
-
Legal names
-
Current addresses
-
Tax withholding details
Also, confirm your companys EIN and other payroll tax details under Company > My Company.
Step 3: Update QuickBooks and Payroll Tax Tables
Make sure QuickBooks is updated to the latest version and install the latest payroll tax table. This ensures that the W-2 and W-3 forms are accurate and comply with current IRS standards.
To update:
-
Go to Help > Update QuickBooks Desktop
-
After the update, go to Employees > Get Payroll Updates
-
Check Download Entire Update and click Update
- Read More:- Update QuickBooks and Payroll Tax Tables
Step 4: Access the W-2 and W-3 Forms
In QuickBooks Desktop:
-
Go to Employees > Payroll Center
-
Click on the File Forms tab
-
Choose Annual Form W-2/W-3 - Wage and Tax Statement/Transmittal
-
Click Create Form
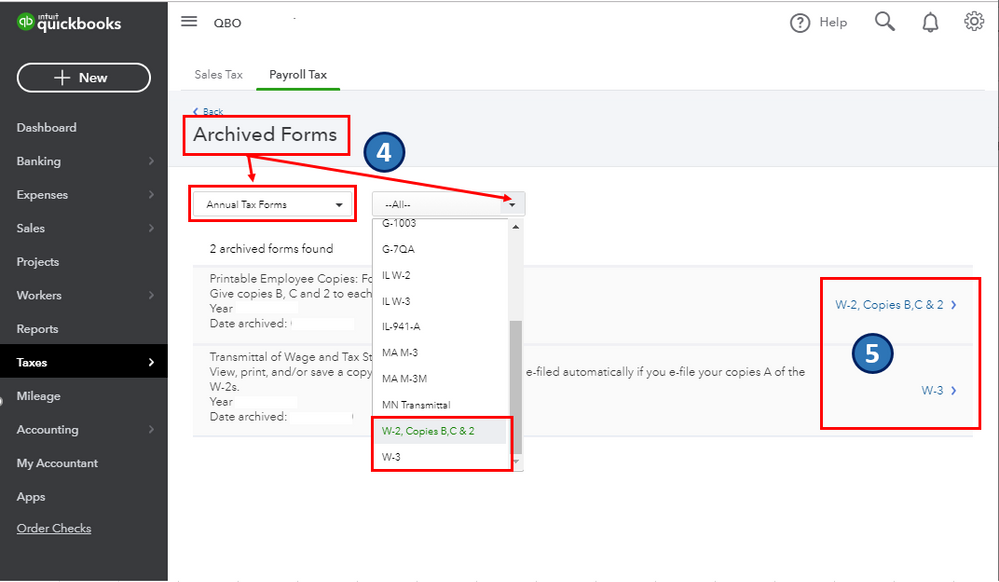
In QuickBooks Online Payroll:
-
Select Taxes > Payroll Tax
-
Under Filings, click Annual Forms
-
Choose W-2 Copies B, C & 2 for employees, and W-3 for SSA filing
Step 5: Select the Correct Filing Period
Choose the year for which you are printing the W-2s and W-3. Confirm it reflects the correct tax year (e.g., 2024 for forms filed in January 2025).
Step 6: Review and Edit if Necessary
QuickBooks will display a preview of each W-2 and the W-3 form. Carefully review the data:
-
Check for missing or incorrect amounts
-
Ensure each employee's wage and tax data is complete
-
Verify totals on the W-3 form match the combined data from the W-2s
Make corrections before printing if anything is off.
Step 7: Print the Forms
Use the appropriate paper for each copy:
-
W-2 Copy A and W-3: Must be printed on pre-printed red ink forms (for SSA)
-
Employee Copies (B, C, and 2): Can be printed on plain paper
Go to the Print/E-file section, select Print, and follow the prompts to choose your paper type and printer settings.
Step 8: Distribute and File the Forms
-
Give W-2 Copies B, C, and 2 to your employees by January 31.
-
Mail W-2 Copy A and W-3 to the SSA by the end of January, or e-file them through QuickBooks or the SSAs BSO (Business Services Online) portal.
Final Tips
-
Always print a test copy before printing the official forms.
-
Use IRS-approved envelopes for mailing employee copies.
-
Keep copies of all forms for at least four years for compliance.
By following these steps, you can confidently print and distribute W-2 and W-3 forms using QuickBooks, ensuring timely and accurate payroll tax reporting.
Read More:- Update QuickBooks Desktop to the Latest Release